


How to Seam Seal a Car the Right Way
- ERIC GIROUX
- May 5
- 6 min read
A lot of rust repair jobs fail for one simple reason - the metal patch was fine, but the seam was left exposed, poorly sealed, or buried under the wrong material. If you want to know how to seam seal a car and have it hold up, the real work starts before the sealer ever leaves the tube.
Seam sealer is not body filler, and it is not a shortcut for bad metalwork. Its job is to keep moisture, road salt, dust, and fumes out of lap joints, welded seams, floor pan repairs, trunk joints, firewall seams, drip rails, and wheel housings. Done right, it helps a repair last. Done wrong, it traps moisture or peels off under paint.
What seam sealer actually does
Factory seams are full of places where water can sit. Spot-welded flanges, overlapping panels, replacement floor pans, and trunk drop-offs all create small channels that collect moisture. Seam sealer closes those paths so water cannot wick between panels and start corrosion from the inside.
That matters on restorations, daily drivers, and race builds alike. A street car needs long-term corrosion protection. A race car may be stripped and simplified, but anywhere the chassis has exposed joints, wheel tub seams, firewall penetrations, or fabricated panel overlaps can still benefit from proper sealing.
The main thing to understand is that seam sealer works as part of a system. Clean metal, the right primer, the right sealer, and proper topcoat compatibility all matter. If one layer is wrong, the whole repair is compromised.
How to seam seal a car: start with the substrate
Most seam sealer problems come from surface prep. If the panel still has rust, wax and grease residue, grinding dust, or loose old coatings, the sealer is being asked to stick to contamination instead of metal or primer.
Start by removing all failed factory seam sealer, loose paint, rust scale, and undercoating from the repair area. A wire wheel, abrasive disc, scraper, or stripping tool works, depending on the panel and how thick the old material is. If you are dealing with heavy corrosion, repair the metal first. Seam sealer is for sealing joints, not covering rust holes or bridging rotten steel.
Once the metal is repaired, clean the area thoroughly with wax and grease remover. Blow out the seam with dry compressed air if needed. The joint needs to be dry and clean, especially in pinch welds, floor seams, and lower body areas where blasting media and moisture like to hide.
If the seam is bare steel, epoxy primer is usually the safest foundation. Many professional-grade seam sealers are designed to go over properly cured or flashed epoxy primer. Some can go over bare metal, but that depends on the product. Always match the sealer to the coating system you are using. If you skip that step, you can end up with adhesion loss, solvent reaction, or topcoat issues later.
Bare metal vs primed metal
This is where people get into trouble. Some old-school products were commonly brushed onto bare steel. A lot of modern systems work better over primer, especially epoxy. If you are working on a quality restoration or long-term rust repair, primed seams usually give you a better result than raw metal alone.
There are exceptions. In hidden areas such as inner structures or certain factory-style repairs, you may be following a specific OEM-type process. The point is simple - do not assume all seam sealers work the same.
Picking the right seam sealer
There is no single best seam sealer for every job. The right one depends on where the seam is, how visible it is, whether it will be painted, and how close it is to heat, vibration, or road spray.
Brushable seam sealer works well when you want an OEM-style appearance on floor pans, trunk seams, or firewall joints. It lets you recreate that factory brushed texture on many restorations. Cartridge seam sealer is better when you need a controlled bead along lap joints, wheel houses, drip rails, or fabricated seams. Two-part seam sealers cure faster and tend to be more consistent, which is useful in a shop environment or on jobs where paint timing matters.
For underside and wheel well areas, flexibility and chip resistance matter more than cosmetic finish. For engine bays, trunks, and interior floor seams, paintability and appearance matter more. If you are building a car that sees real heat and vibration, use a product designed for automotive panel movement, not a generic hardware-store sealant.
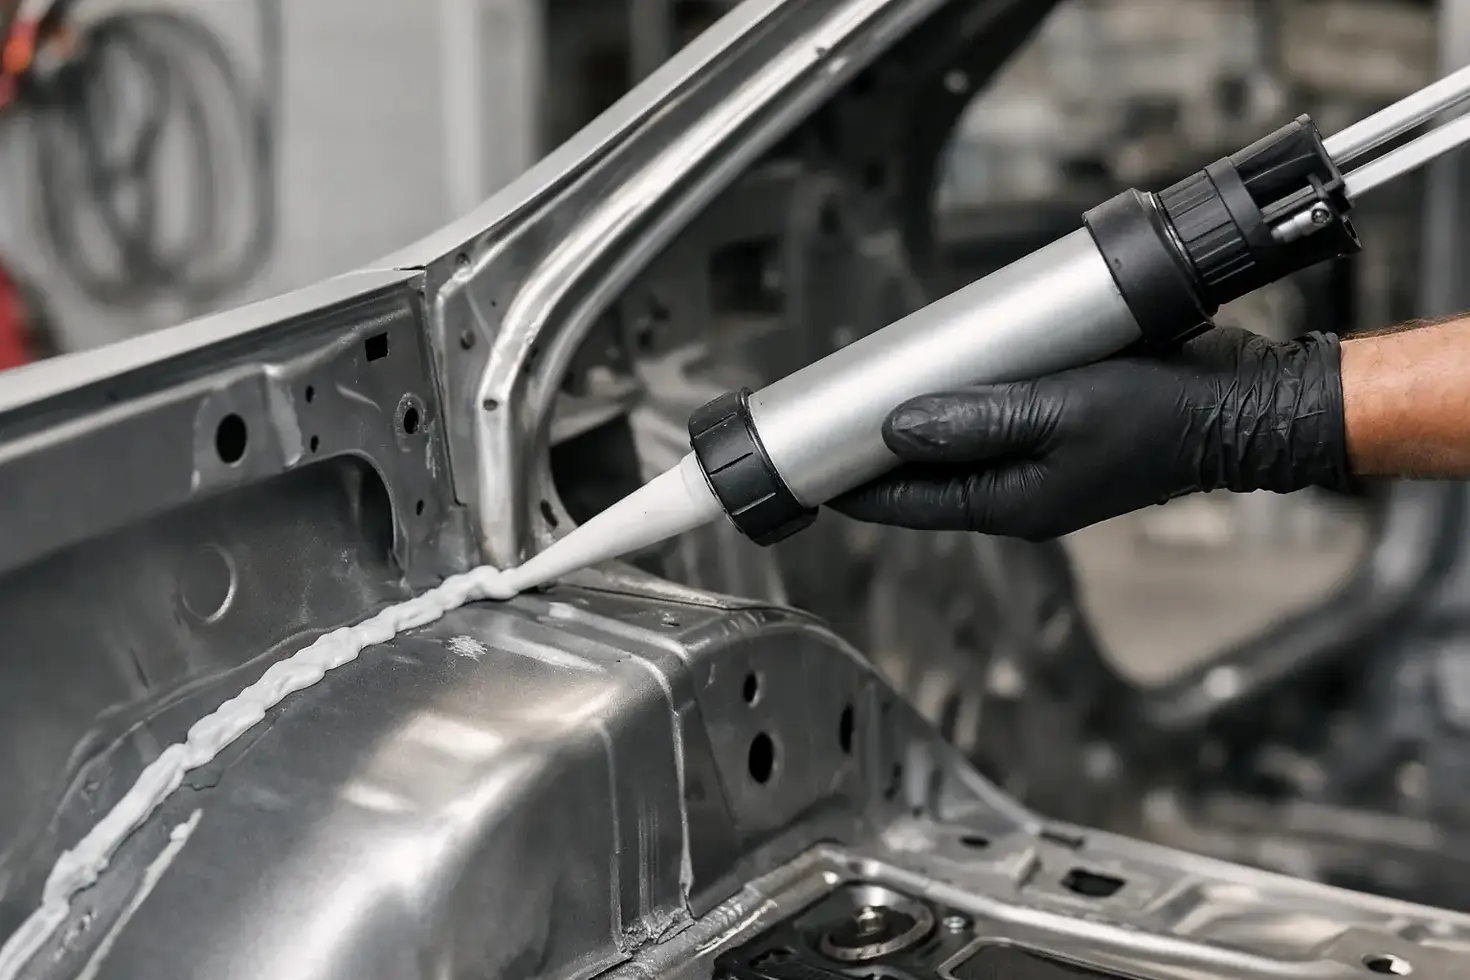
Applying seam sealer without making a mess
When it is time to apply the sealer, cut the nozzle to match the seam width. Too small and you will drag and skip. Too large and you will over-apply material, which makes cleanup harder and can look sloppy under paint.
Lay the bead directly into the seam with steady pressure. On cartridge products, a caulking gun with smooth control helps a lot. Once the material is down, tool it immediately if the product calls for tooling. A spreader, acid brush, or gloved finger can work, depending on the texture you want and the manufacturer instructions.
You are not trying to pile material on top of the panel. You are trying to push sealer into the joint and leave enough film thickness to stay flexible and sealed. Thin spots fail. Giant blobs also fail because they skin over unevenly, trap solvents, and look amateur under paint.
Where to seal and where not to
Common areas include floor pan lap seams, trunk floor joints, wheel houses, rear body panel joints, cowl seams, drip rails, firewall seams, and inner fender seams. Replacement quarter panel flanges and trunk drop-offs often need careful sealing after welding and priming.
Do not seal drain paths that were designed to stay open. This is a common mistake on doors, rocker cavities, trunk channels, and some lower body structures. Water has to escape somewhere. If you block a factory drain route, you can create the exact rust problem you were trying to prevent.
Let cure times and paint windows control the job
A rushed paint schedule can ruin a good seam sealing job. Some products can be topcoated while they are still in a specific flash window. Others need full cure first. If you topcoat too early, solvents may get trapped. If you wait too long, you may need to scuff the surface for adhesion.
This is one area where following the technical sheet matters more than habit. Temperature, humidity, film thickness, and product chemistry all affect cure time. Urethane seam sealer behaves differently than waterborne or two-part materials.
If the seam will live underneath the car, many builders topcoat or undercoat over the sealer once it cures. That gives you another layer of protection against abrasion and moisture. In visible areas like the engine bay or trunk, the final paint system usually goes right over the sealed seam after the proper flash or cure period.
Common mistakes that cause seam sealer failure
The most common failure is applying over contamination. The second is using seam sealer to hide bad fabrication. If the panels do not fit, if pinholes were never welded, or if rust was left in the joint, the sealer is covering a problem instead of solving it.
Another mistake is picking the wrong product for the area. A brushable interior-grade seam sealer may not hold up like a tougher material in a wheel well. The opposite problem happens too - heavy textured material gets used in a visible area where a cleaner bead would have looked better and painted easier.
People also miss backside protection. If you repaired a floor pan, trunk floor, rocker patch, or lower quarter, the front side seam may be sealed perfectly while the backside remains bare. That repair still has a weak point. Cavity wax, frame coating, or internal rust protection is often the difference between a repair that lasts two years and one that lasts ten.
Best results come from treating seam sealer as one step in the system
If you are doing quality restoration or rust repair work, think through the whole stack. Metal repair first. Then cleaning, corrosion protection, primer, seam sealer, topcoat, and hidden-area protection. That sequence matters more than brand loyalty or tube style.
For custom fabrication and race car work, the same rule applies. Freshly welded panel joints, tubs, firewall modifications, and fabricated interior panels still need to be sealed where moisture, fumes, or debris can get through. A clean chassis is not enough if the seams are left open.
At GTPRACING, that is the difference between a car that looks finished and one that is actually protected. Do the prep work, use the right material for the location, and give it the cure time it needs. Seam sealer is cheap compared to doing the same rust repair twice.
The job is not glamorous, but it is one of those steps that separates a quick patch from a repair you can trust when the car sees rain, track debris, wash cycles, and real time on the road.


Comments